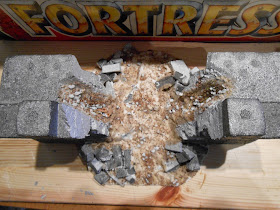
So I promised you a breached wall section and here it is for those that care. I'm rather chuffed with how it turned out but I'll make this a quick pictorial with but a few words. Still so much to do.
The breached section is made from one of the vast surplus of gateway sections you get from three sets. It is going to need a base but because I don't want it any higher then the rest of the fortress I start by slicing off the bottom mm a few cm either side of the gateway.
After hot glue gunning the base and trimming it in a rough ovalish shape I add chunks of the offcuts and fill with, er... filler.
And that's it for the first night let the filler dry. You will hopefully notice that I have carved out the block shapes from the edges of the collapse.
Speaking of which I then carved up the excess from the tower conversion trying to cut out individual blocks.
These blocks are added to the base and PVA coated around them to stick sand and small stones to.
The core of castle walls are made of rubble in a lime mortar. I've tried to recreate that look by carving out the centre of each wall and adding alot of model railway ballast.
You can see the effect best from above. In the UK we are very lucky in having a great many castles, some in exactly this state and to my eye this is about right.
The view from inside the fortress.
Here with a miniature for scale. The breach fits three 20mm bases. I'll make the second one bigger.
Now onto the keep in progress. Not much but I got the stairs modelled. from blue foam.
Mounted on it's base the stairs look pretty good in place. I can only stand miniatures at the top but I couldn't make the stairs look right with wider steps.


It's looking good Erny!
ReplyDeleteThe only criticism I would make about it is that the smooth angle you've cut the upper parts of the breach at doesn't look natural. Maybe cut it jagged & at 90° so it will look like the stone's have collapsed out of place?
Don't get me wrong, I think it looks fantastic! The rubble, the base & the lower section all do it for me.
Just realised that this is a WIP. You were probably gunna to do that anyway :)
Cheers.
I had the same thoughts about the upper parts myself, now you've mentioned it I think I'll do a little more work on it. Thanks for the constructive (or is that destructive) criticism.
DeleteNice work on the breached wall.
ReplyDeleteCheers, now I've started I'm getting lots of ideas, shame I left it so close to the big day.
DeleteThis looks really great Erny...I can see many an epic battle being fought for control of that Breech! what fun!
ReplyDeleteIf you are willing to part with one of you "extra" gates please let me know so I can duplicate your achievement. I had never thought of using the gate wall section but it just makes sense!
Blue
Somehow I missed that I do indeed have four boxes of mighty fortresses in my garage so there is a good chance I'll have a spare gate. I'll let you know once I've accomplished everything I want to get done.
DeleteLooking really good! Just awesome in fact. And thanks, you have given me lots of great ideas (and some hints) and now I'm just afraid mine won;t look nearly as good! One thing, the plastic castle does not have the material in the walls, so I have to recreate anything I want in there. Thinking foam inside and then rubble-ize it, any better ideas? Can't wait for part 3!
ReplyDeleteYes the expanded polystyrene is quite dense and a pain to cut accuratley with a knife but I imagine much better suited to this sort of conversion than your plastic ones.
DeleteA fine job!. Now you make us envious. Would you let me know what are the dimensions of the walls, bastions to make me an idea of the size of the fortress? thank you in advance
ReplyDelete